Sharing Patches on the Steam Workshop: A Guide to the Steam Hub
How to publish your patches and projects to the Steam Workshop, and how to install and update other people's, using the Steam Hub in Sigilgraph Audio Workbench.
The Steam Hub connects your workbench directly to the Steam Workshop for finding and sharing modular setups. If you run Sigilgraph Audio Workbench from Steam, you get one centralized window for Workshop integration: exploring and auditioning community content, managing published uploads, and packaging your own work for distribution. This guide walks through its three tabs.
The Steam Hub is only available in the Steam build, and Steam has to be running. If it is not, the Hub reports an offline state. Start Steam, launch the app from it, and reopen the Hub.
1. Installed: using other people’s work
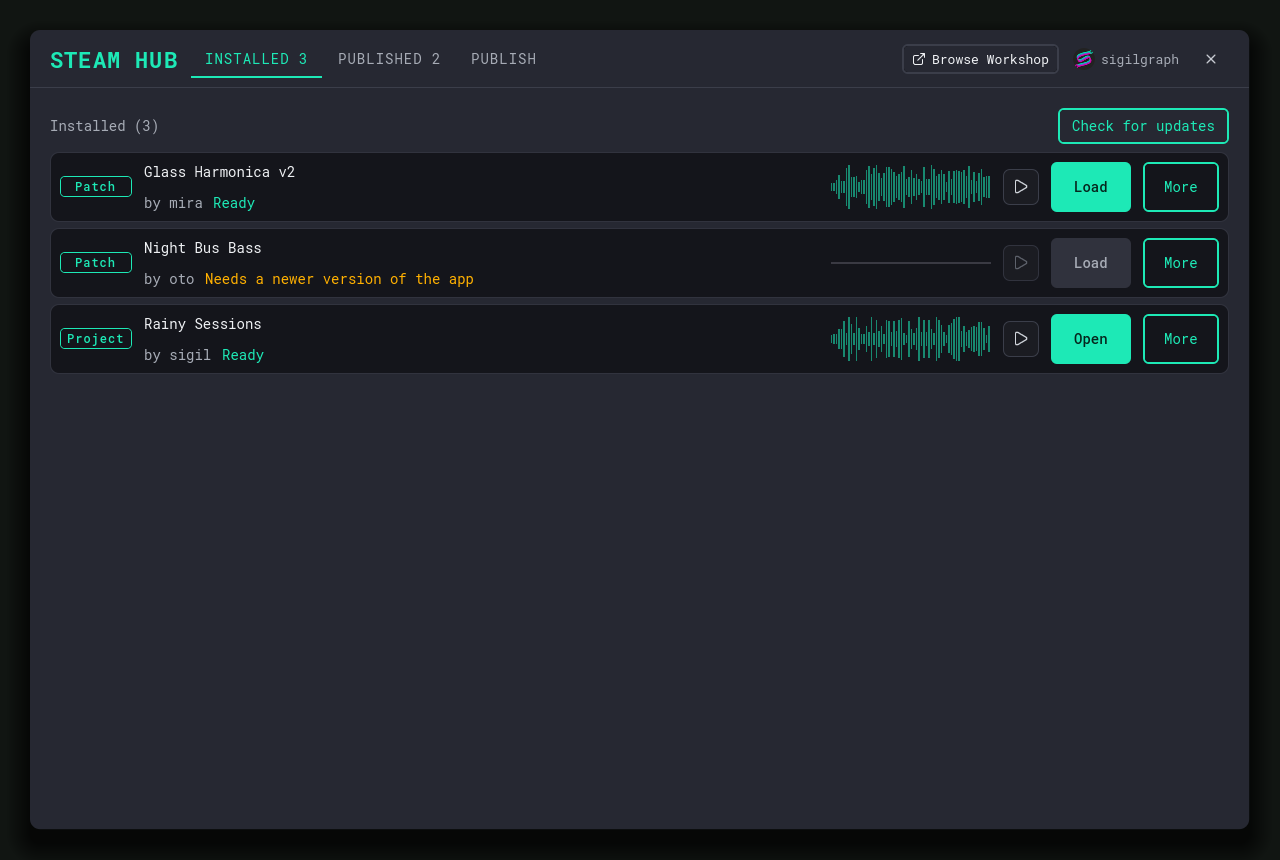
To get something, click Browse Workshop at the top of the Hub, find an item on the Steam Workshop page, and click Subscribe. The Installed tab ingests it automatically the next time you open the Hub, or right away if you press Check for updates. Each row displays whether the item is a Patch or a Project, who made it, and its ingestion status.
- Audio Previews: Listen to a 15-second audio preview and inspect its waveform in the list before downloading a patch or loading it onto your canvas. The embedded waveform display indicates preview playback progress in real time.
- Direct Loading: Downloaded patches (
.workbench) load directly onto your active canvas. Full arrangements (.sawp) open in the Project Manager as distinct projects. If your active canvas contains unsaved changes, the Load button prompts for confirmation before discarding them. - Read-Only Protection: Subscribed community patches are set to read-only to prevent accidental overwrites. Editing and saving an installed community patch automatically creates a local copy with a “(fork)” label (such as
<Name> (fork)). Autosave processes also never write into subscribed Workshop directories, ensuring community assets remain unmodified.
The More menu lets you view the item on Steam, export it as a .sawp file, reinstall it if local files were damaged, or unsubscribe. If an item says “Needs a newer version of the app”, it was packaged under a newer schema release. Update the application to restore access. Workshop items are stored in item-scoped folders, so they never overwrite your local work, and unsubscribing removes only that item.
2. Published: managing what you have shared
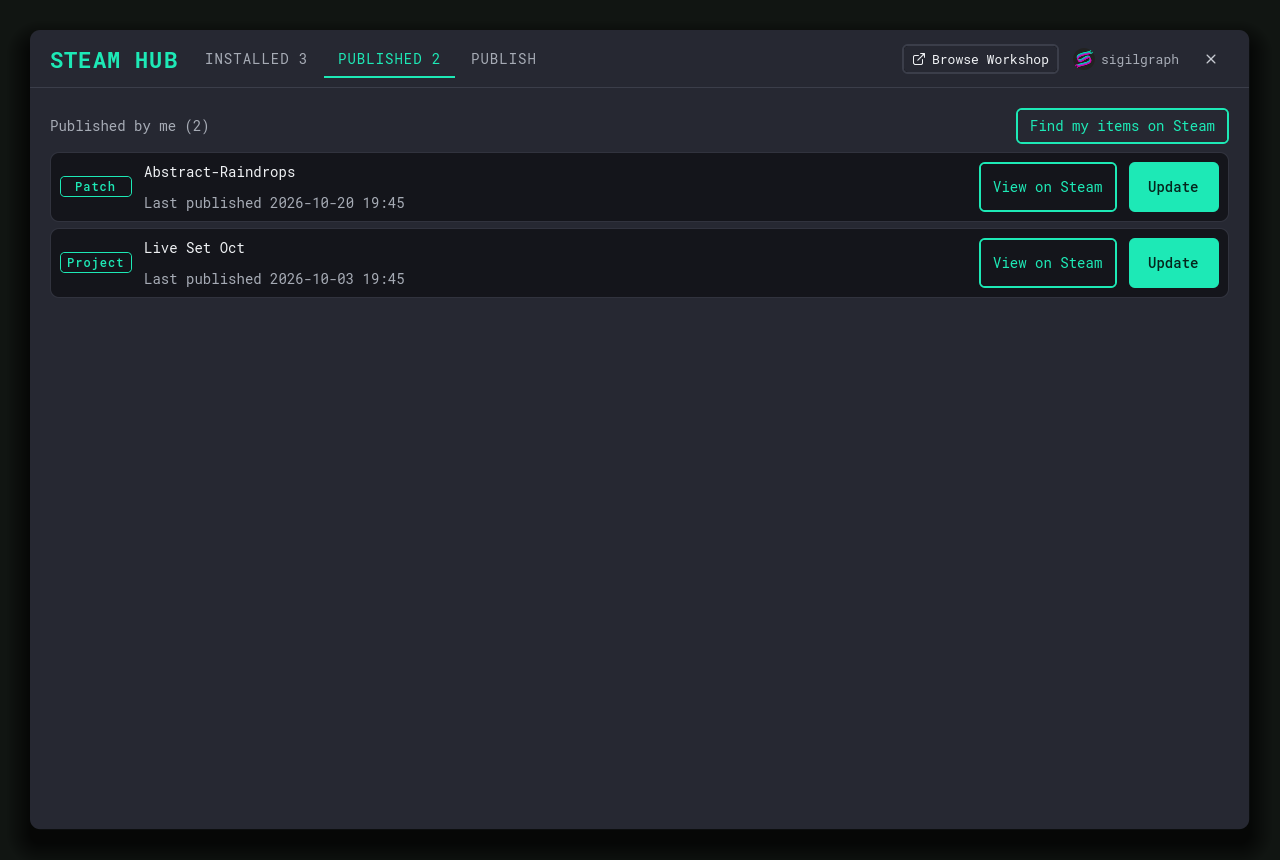
This tab lists every item you have uploaded, with its publication status and the timestamp it was last published.
- Published Item Management: The Published tab updates your list based on your Steam account, reconciling your local records with Steam’s remote Workshop index.
- Safety Checks and Grace Period: Built-in safety checks prevent removing items published in the last 10 minutes. Because Steam backend queries may take time to index newly submitted items, this 10-minute grace window guarantees recently uploaded items are not mistakenly dropped from your list if early queries return incomplete results.
- Local Removal: A local Remove button lets you clear items from your view without deleting them from Steam. The button uses a two-step confirmation (arming to an armed state before running) to clear the local record while keeping the Workshop upload live on Steam.
- Unlinked Items: If your machine loses its local ledger or you move to a new computer, checking Show unlinked items queries Steam for items associated with your account and lets you link each item back to a local patch or project. Publishing an update to a linked item updates the existing Steam listing instead of creating a duplicate.
3. Publish: uploading your own patches and projects
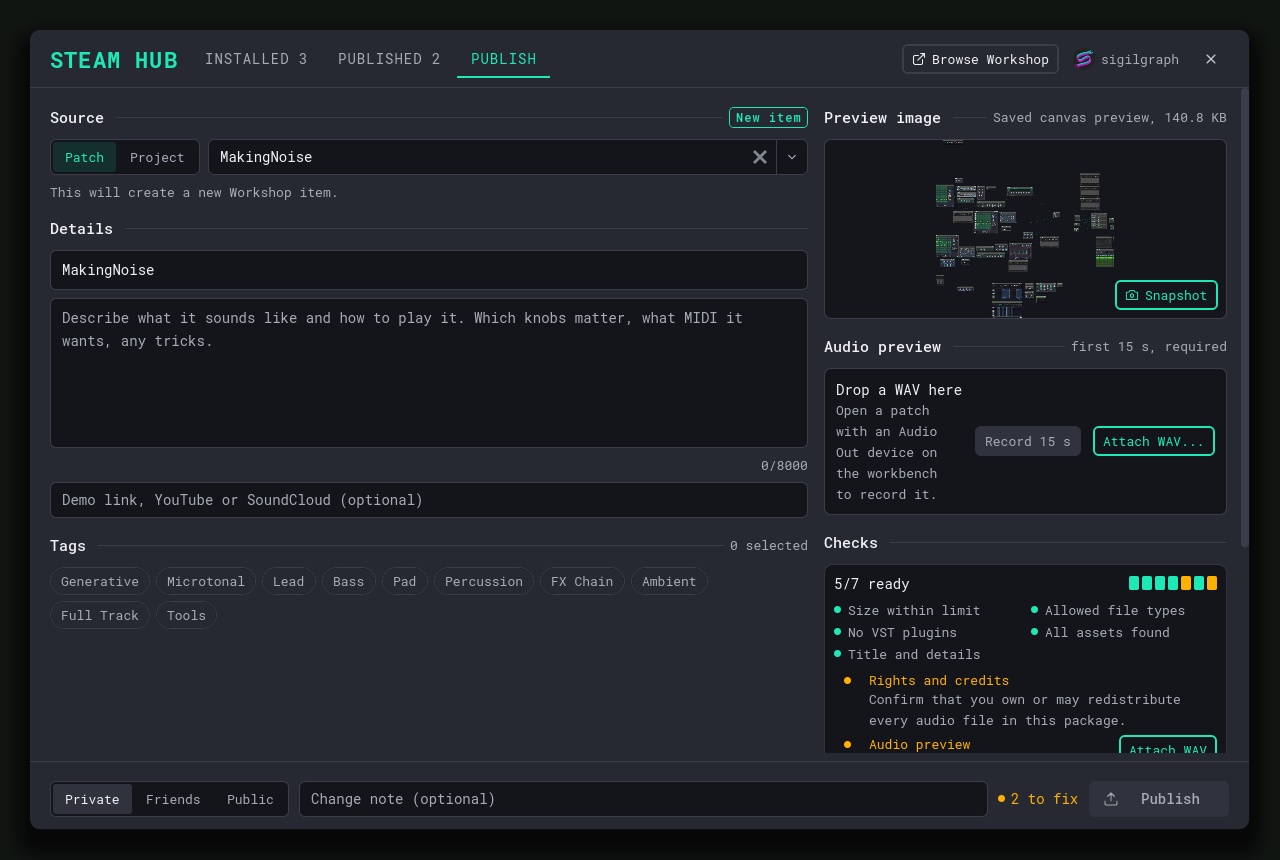
Choose Patch or Project, then pick a saved item from the list. Only saved work appears here, so save your patch first. Provide a title, describe how the patch functions and how to operate it, and select relevant category tags.
Publishing Pre-Flight Checks
When uploading to the Workshop, the publisher executes automated pre-flight checks before packaging. The Publish button stays disabled until every check passes:
- File Size Verification: The publisher verifies file sizes stay within limits. Patches must remain under 100 MB in total (individual files under 50 MB, maximum 256 files). Projects may total up to 250 MB (individual files under 100 MB, maximum 2048 files). Only the upload package is constrained; your local project files are never altered.
- File Extension Verification: Confirms all package files use permitted extensions (
.workbench,.dvc,.wav,.flac,.ogg,.mp3,.mid,.midi,.sf2,.scl,.kbm). Arbitrary file extensions, scripts, and executable formats are rejected. - Blocking Binary VST Plugins: Blocks binary VST plugins. Because VST plugins are compiled native libraries (
.dll,.so,.dylib), patches referencing VST devices cannot be uploaded to ensure platform portability and system safety. - Asset Dependency Bundling: Bundles referenced sample and IR (impulse response) files into the package. The publisher scans device graphs for audio file dependencies and packages local samples and impulse responses alongside the patch so other users can load the patch without missing audio assets. Files located outside the application user directory must be imported into local storage before publishing.
- 15-Second Audio Previews: A 15-second audio preview is required. Press Record 15 s to render it directly from the active patch open on your workbench, or attach a pre-rendered WAV file. The recorder encodes the audio into normalized Ogg Vorbis with embedded waveform envelope data.
- Visual Snapshot: Requires a title and a preview image. The system uses the saved canvas thumbnail or captures a frame using Snapshot.
- Rights Attestation and Credits: If your item bundles audio files, you confirm that you own them or have redistribution rights, and enter an author, source, and license for each asset. These are compiled into
.workshop/credits.mdinside the package.
Before uploading, choose the visibility: Private, Friends, or Public. You can also supply an optional change note when updating an item. New items default to Private on Steam. After uploading, use Open on Steam to inspect the item page and set final visibility. First-time publishers must also accept the Steam Workshop legal agreement on Steam before items become public.
Quick start
- Launch Audio Workbench from Steam and open the Steam Hub.
- Save your patch, open the Publish tab, and select it from the list.
- Add a title, description, a preview image, and a 15-second audio preview.
- Ensure all pre-flight checks pass, select visibility, and press Publish.
- Open the item on Steam to review the page, accept the agreement if required, and share the link.